Sunday, December 7, 2008

Carving Santa-cicles


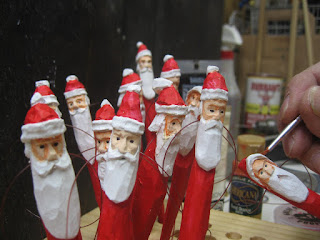
Santa-cicles are carved from short sections of basswood. Most of the carving is done with a detail knife, the finer details are done with very small chisels I bought from Bob Muhle, a model ship builder. If you click on any of these photos you really get a close-up view.

Santa Cicles Nearly Finished

These Santa-cicles are getting the finishing touches with acrylic paints. They have fishing line loops so they can be hung on tree.

Wednesday, December 3, 2008

A Gathering of Santas


This small group of Santas is on a break from the chores they must finish before the 25th. They've been working pretty hard and look a little bewildered. The two with the sacks are in the next to the last phase of their training, "Sack Packing", the last phase is "Navigation and Reindeer Control". By the way they wish a Merry Christmas for all.

Small Bronze Figures


These are some of the small bronze figures I've been working on from time to time. The tallest is close to 10 inches high.

Santas at the Front Door


These Santas are in charge of greeting folks who come to our door.

Sunday, November 23, 2008

Trip Up The Oswego River With Phil D.


18 July 90 Phil D. and I paddled up the Oswego River in the Pine Barrens of NJ. I tried to photograph the page so Phil could see it again. It was in the Spring of '90 I started a fishing log, keeping track of what went on during my trips. Funny how much I've forgoten about these excursions..it's really nice to look back in this log and be reminded of so many wonderful times.

Tuesday, November 11, 2008

Wood Spirits Find Work on Fence Line


Sometimes the wood used in carving a Wood Spirit doesn't respond well to detail. Where there was thought to be firm wood just crumbles under the chisel. These guys found use as fence posts. Today is my daughter's birthday. Happy birthday, Liz !

Monday, November 3, 2008

Hawk and Curlew


A Hawk in black walnut and a Curlew share a spot in the book shelves.

Copper Leafed Rainbow


A twenty-four inch Rainbow Trout, carved from 2 x 8 lumber, leafed in copper, floats above the kitchen cabinets.

Saturday, November 1, 2008

Snowy Owl


This Snowy Owl flew off to Harrington Park, NJ. This was the owl that was supposed to be mounted in the North Carolina Botanical Garden on the top of a corner support of an arbor. Then someone mentioned that the only way a snowy owl would get to North Carolina is by being stuffed and brought down. That, of course, is how the a Great Horned Owl was carved to fill the job at the gardens.

Who, Who, Who, The Hell are These Guys?


For a while I was into carving owls. I still do from time to time carve an Owl or two.

Friday, October 31, 2008

Roughing Out a Wood Nymph


While roughing out the carving of a Wood Nymph it became obvious that this piece of cedar was going to be a problem. Early on while working on the face and the hair line the wood split and forced a change in the original plan. I found I couldn't be pounding away with my rubber mallet without splitting the wood so I had to lighten-up and use an angle grinder. The grinder does a good job , but I worry about the saw dust. Sounds funny from a guy who smoked for too many years. The grinding disc I like to use is shaped like a saucer with teeth on the edge which scoop out slivers of wood as it spins. The wood it removes isn't small enough to get airborne.

Wood Nymph Nears Completion


The details have been worked with a variety of chisels. The wood is Cedar, and this particular piece seems drier than most I've worked with, so I've painted it with PEG 6000 in an effort to add some moisture and minimize its tendency to split or check. I'm going to try to locate a cheap source of anti-freeze, some folks use polyethylene glycol anti-freeze to moisten the wood. I'll leave her standing in the garage and try to come up with an idea for the final finish. I can't really refine the features any further. At least it'll make a nice outdoor piece if left the way it is.

Friday, October 17, 2008

They're finally up front for Halloween


Halloween is definitely getting close. These characters love Halloween. They spend most of their time in the back yard. I've been adding a member to this cast of beauties each year. They like to be where they can startle the joggers and terrorize the walking dogs and wish everyone a Happy Halloween!

Friday, October 10, 2008

Chrysanthemums Join The Band


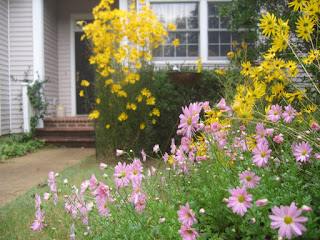
Lavender mums look really striking next to the Swamp Sunflowers.

Thursday, October 9, 2008

Trout Fishing in Stone Mtn. State Park

When I go to Stone Mountain I look up at that huge bubble of granite and I'm reminded of a day when I walked to the top. Both of my sons have spent some time here. Mark, here climbing the mountain, Scott, fishing the river.
I took a campsite in the clearing rather than set-up on a wooded site. The weather was predicted as partly sunny with a chance on showers. I thought the open site would speedup any drying of the tent. It seemed too dark under the canopy of the oaks.

The Tent is Good to Go.


The back door to the tent is opened here, it makes for easy access. What I love about this tent is that it has a little screened area at the other end. There I can have a small table with stove and a chair. If it rains I can cook right there and be out of the rain. This is also the first time for me to have a regular pillow to sleep with.

A Beautiful Section of The river


Many places such as this remind me of the Willowemoc in the Catskills. This shot was taken looking down-stream. The day was gray and misty.

The Bridge

A favorite spot of mine. The wind would kick up and leaves would flutter down on to the surface. When there were a lot of leaves it was difficult to cleanly pick up line for the next cast. In a few minutes with only a little wind the leaves would drift to the bank like little sailboats. This pool is usually loaded with fish, since the stocking truck can come very close to the stream. My line is out on the water, the fly is undisturbed by any fish.

The Magical Pool By The Bridge

This pool has always been a wonderful pool for me. Almost every time I get to fish it. I get a fish. Even when I was giving a demonstration of how to catch a trout on a dry-fly. There was talking, shuffling of feet, still with all the commotion a trout still rose to the fly and ultimately into the net. Behind the rock nearer the center of the stream is the holding spot where I usually find a trout.

A Really Nice Rainbow


This 14" Rainbow with the blushing cheeks came out of what I like to think of as the magical pool. I was surprised to find so heavy a fish there so early in the day. The fly, a Lady Heather rests on it's side.

Another Beautiful Pool


A beautiful pool yields several fine fish. I usually start at the bottom of this pool and slowly work my casts closer to the chute of flow. Today I was able to net three fish before they got wise.

A Brown Trout


Here's a nice little brown that came out of that beautiful pool.

Dinner


The beans and hot dogs were fortified with some TVP. Being out-of-doors really gets me hungry, so this did not last long. This was supper one night, the next supper consisted of creamy chicken soup with a packet of chicken pieces added. On the next trip I'm thinking of bringing some flat bread for wraps and general use.

Evening Arrives


It's a very comfortable evening. Dinner is finished, the dishes done, and coffee set up for the morning. I could hear what was a bunch of squabbling dogs in the distance. A neighbor camper said they were coyotes or coydogs passing through the area.

At Day's End

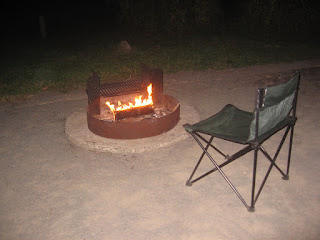
After a day of fishing, it's nice to sit by the fire and think about it all. I was lucky to bring some nice fish to the net. As usual, there were the one's that got away. I cheat here in the fire department, In days gone by I would have collected logs and struggled to start a fire. These days i put one of those compressed fake logs on and with one match we can enjoy the flames for several hours, no muss, no fuss.

Tuesday, September 30, 2008

The yard a few weeks ago


This was the yard a few weeks ago , when I told my sister-in-law that it would soon be spectacular.

Now This Is What I Mean By Spectacular!

The Crow and the Merganser are virtually finished

The Crow sits on the work bench, and the Merganser is sitting in my favorite chair. The Merganser has been covered in copper foil. The copper comes in packets of 4"x4" sheets and is handled like the gold that is used in gilding. The great thing about the copper is that it is very inexpensive and it's able to take a patina. One omission, was that I did not paint the bird first, so that if the copper did not stick, the undercoating would show. So now I have some bare wood showing.

Thursday, September 25, 2008

A Recipe For Crepes

I was telling someone about how my wife and daughter love to have Crepes for breakfast. The recipe I use is in a Betty Crocker Cook Book from the 60's. 2 tbsp butter is melted into 1 cup of milk then cooled, next 2 eggs are beaten. When the milk has cooled the beaten eggs and 1/2 cup of Gold metal Flour, 1 tsp of baking powder and and 1/2 tsp salt are beaten in to make a smooth batter. I use a 5" in diameter iron skillet at moderate heat. Coat the bottom evenly by tilting the pan. Cook for a minute, flip and do other side, brushing some butter on the pan evry now and then. I stack them in sets of four and separate them with wax paper until I use up the batter. They can be frozen, so each set of four can be thawed as a serving. I usually do a double batches.

The sauce we like is an Orange Sauce; In a fry pan melt 1/3 cup butter, 2 tbsp sugar, 1/3 cup orange juice and some orange rind. I section the orange and add them to the hot sauce and crush them. Turn the crepes into the sauce, fold into quarters and put on plates, spoon some sauce over them. My gang would have me making these all the time, so I restrict this treat to Mother's Day, extra special occasions or when I'm in serious trouble.

Tuesday, September 23, 2008

One of the better Crows I've done .

This is one of the more realistic Crows I've be able to do so far. There's a lot of work still left here, the tail has to be trimmed to the right length and legs added so it can be mounted. I'm going to use an aniline dye for the black color.

A Merganser


After band-sawing the profile and roughing out the body, the Merganser duck is clamped firmly so it'll be easier to work on. I left the tail part still squared so the clamp would hold tight. The first live Merganser I ever saw was on the East Branch of the Delaware River in the Catskills. There were a two on the far side of the river where I was casting for rising trout. I couldn't reach the other bank with my cast. I got as close as I could without filling my waders. These Mergansers were catching fish. I've been intrigued by decoys carved by others. The Merganser has a narrow bill which has serrations on the edges which really help for catching fish. I understand their Mom doesn't feed them, they catch their own. Within 12 days they're catching fish. My kind of duck. One decoy I recall had coarse hair inserted at the rear of the head to represent the crest, I going the carve the feathers in rather than implant hair. I'm also working on refining the way I do Crows, another bird I find fascinating. I'll show them both finished in a later posting.

Saturday, September 6, 2008

Sitting Out a Storm called Hanna

The tropical storm Hanna has moved up the coast. For me it was a day of fly-tying and sorting stuff in the materials collection. I tied a bunch of Muddler Minnows today, some White and Grey Wulff hair flies, a few Adams', and a couple of Pheasant Tail Nymphs . These flies are staples for me when I fish. They get a workout. I really like catching Trout on the surface but ai do like hanging a Pheasant Tail Nymph from the bend of a top water Muddler Minnow. I'm going to try to tie a few on size 16 hooks or even smaller. I really need to be in the mood for small. It can be very frustrating while my hands tremble and my eyes struggle to focus. My head magnifier keeps slipping off my head. I start fumbling, the scissors manage to cut the tying thread before I'm finished, the windings slip their knot and magically unwind like some animated joke. At this point things aren't fun. Anyhow, there's college football today, and I'm looking forward to watching some of it on TV.

Wednesday, September 3, 2008

Shaping the Spun Deer Hair

I'm using scissors to shape the spun deer hair head of a Muddler Minnow. I love fishing the Muddler Minnow with a small dropper of about 15" with a Pheasant Tail Nymph. The dropper is tied at the hook bend of the Muddler. The Muddler acts like a strike indicator and sometimes attracts a huge trout who passes up the relatively tiny Pheasant Tail Nymph. I found I could tie the dropper to the bend using a Duncan loop, which can be loosened easily.
Posted by Picasa

A Muddler Minnow Nears Completion

This Muddler Minnow is nearly completed. I'll whip finish the head and apply a drop of glue to secure the ties. The final step is to trim it to the desired shape. These last few days have gotten my blood up for going fishing. When I looked over my stuff I found my collection of Muddler Minnows were battered and in sorry shape. I'm also anxious to replenish some of the Wulff Hair Flies I've come to love, as well as, some Adams'. I haven't worked on Muddler Minnows since I did with Wendell Niemann. He was the one who taught me how to tie it. I miss fishing with him.

The Fly Tying Box

Monday, August 25, 2008

My Wood Nymph Found a New Home

Last Saturday, at "Come Out and Play", was a beautiful day. The grounds at JimGin Farm were covered with all sorts of art work....My Wood Nymph caught someones eye and she was taken off to a new home. This gathering is scheduled for the next four Saturdays, and will last from 4PM 'til " the cows come home? I'm thinking of replacing the missing carvings with others.

Tuesday, August 19, 2008

A Wood Nymph and Wood Spirits


These carving are going to be displayed at the 7th annual "Come Out & Play" opening on Saturday, August 23rd at JimGin Farm, on Wild Horse Run, off Jones Ferry Road. Debbie Meyer, Eric Brantley and Beckett are hosting this gathering of artists and in support of artists. Picnic food and drinks will be provided. Debbie, Eric, and Beckett have generously opened their farm to displays of art on the 30 Aug, 6th,13th, 20th, and 27th of Sept. (all Saturdays) Call 942-3252 for more info. One of these guys appears in the carving demo. which follows this posting. I'm starting to get my blood up for creating more Wood Spirits and Wood Nymphs. I've got the materials available, now all that's needed is "the drive to do". It's funny how that comes and goes. We'll have to talk about that some time.

Monday, August 11, 2008

How I Carve a Wood Spirit


After securing the wood to be carved so it won't wobble or fall over while being worked on, a sketch is made outlining the face to be developed in the wood. The wood shown here is Eastern Red Cedar. Special attention is paid to where the nose will be placed. It's really important to put it where the wood is free of knots and blemishes that may interfere with the carving of the nose details. The first thing carved is the nose. The first cut is a Stop-cut under the tip of the nose. Wood is then gradually removed establishing the eye socket areas and the cheeks. The sketched lines are replaced as the carving progresses as not to lose the original intent.

The same curved chisel is used to under-cut the tip of the nose, the bottoms of the nostrils, and the sides the the nostrils. The use of the same curve while developing the nose gives a harmony to the different elements involved.
The mustasche and mouth are cut into place.
A detail knife and other tools come in handy in putting the details in on the eyes .
The whites of the eyes are painted with a wash of white acrylic. Painting the eyes works out better if the wood is a little dry and splinters easily.
Blue acrylic paint is used for the iris.
The pupils are added to the eyes using a black acrylic paint.
The Wood Spirit is nearly complete, only lacking the finishing touches. Some "V" tool work on the hair and maybe some acrylic painting in of shadows, like accenting the shadows under the eyebrows.

"Driving Miss Daisy"

Saturday, August 2, 2008

Two of the Figures from "The Trail of Tears" installation


Here is a closer look at two of the figures which appear in "The Trail of Tears" which was posted on the 24th of July.

Wednesday, July 30, 2008

Black Walnut Reclining Nude


One of my neighbors had a walnut tree come down in a storm. They asked the yard man doing the clean-up to cut the tree into 4 foot lengths, he thought she said fireplace length. Still I was able to get the most out of the walnut available. The finish is for the most part just Tongue Oil, 'though I did need to color the sap wood with a little Cordovan shoe polish.

Copper-Leafed Cedar Figure


Cedar, 20" x 5" x 4"

Ceramic Figure Study


A Ceramic figure study, about 2"x 2 1/2"x 6".